Smokey Eye Tutorial! 10 steps in 10 mins! Beginner and Mommy friendly.
Saturday, May 04, 2013This is THE perfect smokey eye for Beginners, Mom's on the go, and for someone who is just getting into makeup and would like to try the Naked Palette.
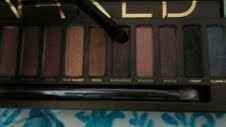
I'm using the naked 1 Palette along with some matte eye shadows from wet and wild. I have them for over two years and they are great because it's hard finding really nice pigmented eye shadows. I've only listed some products because My focus is more on the way you should do a smokey eye rather than what I'm using. But, if you have more questions on eyeshadow brushes etc. Please comment below!
Here are links where you can purchase them if you are interested. Also, The eye primer I have used is the Urban decay primer potion that comes with the Naked Palette.
1.Naked Palette
2.Wet and Wild (go to the local Walgreens/Cvs/Rite Aid/Drugstores)
TUTORIAL!
(Sorry my eye was red all day thought I was catching pink eye!)
STEP 1:
Prime the eyes.Start off with clean eyes, free from oil. It's SO important to prime you're eyes. Helps from creased eyeshadow, fall outs as well as pigmentation pay off.

STEP 2: BROWS! Okay, So many people do not fill in their brows. My eyebrows are super clean, and naturally arched the correct way but where I need filling in mostly in the front(towards nose) so my eyebrows don't look "gray" or they don't disappear in pictures! I don't like a dramatic full eyebrow fill in. To each his own.Here is something similar I used for my brows ***Quick brow lesson: inner corner of your eye ducts should be diagonal from where you're brows start


 **As you see now you can see the light brown is on the crease. It's there to help prevent bleeding of the black we will use DO NOT apply eyeshadow past this crease. It is there to help you!
 A.
A.

 D.
D.STEP 7. This is What it should look like so far... Grab some Dark horse on a flat shadow brush and put over the black and deep in the color to you're liking Place it in the crease, switch brushes. Grab a fluffy blending brush and blend on the outer third of the eye. Make sure shadows are blended. I'm showing you that mostly after every step it's very important to blend in order to get that gorgeous transition color and look


STEP 8: Apply a MATTE eyeshadow under the eyebrows to make the smokey eye stand out. This is a step most people skip, or do not do put this really puts the look together. Blend with first brush you used for the light colors! Blend blend blend!


STEP 9: Place the black and brown on you're lower lash line on the outer third of you're eye. DO NOT put it all the near you're tear ducts as that will make you're eyes look smaller. If you already have small eyes and are concerned about doing a smokey eye. Add a white eyeliner to you're inner water line to make you're eye appear larger. ** I do not do this step **


 Apply eyeliner staring in the middle of you're lid, and work you're way to the outer corner. You can do a winged eyeliner but this is a more casual, mommy friendly look.
STEP 10: THE CLEAN UP! How many of you women have tried doing the smokey eye and have said " Okay I seriously look like I got punched in the eye! Since I don't have much under eye circles as you can see...**Thank you for the Lakhani genes** it's very important to clean up after doing a smokey eye because of fall outs of dark eyeshadow you have used. Most MUA's say to do a smokey eye before applying the rest of you're face but it really doesn't matter. As long as you are applying the concealer last. I most likely always use something narrow, with a wand or sponge just so it can get into the small parts of my eye. Apply down to the middle of your cheeks TILL the temples on the side and Blend away with a DAMP beauty sponge. Do you look like a raccoon anymore?! CONGRATS! you have successfully completed a smokey eye and do not look like a Raccoon! This my favorite step!


***And here are Pictures of my finished look...***

.jpeg)
.jpeg)
.jpeg)
---Thank you SO much for tuning in! So far, this was super tedious and I had to put a lot of effort to do this and make it easiest as possible for you. I hope you try this look and can confidently rock it! :)---


0 comments